Pages

Tuesday, May 28, 2013

How to Update Samsung Galaxy S III i9300 to Official Android 4.2 Jelly Bean


Official Jelly Bean update for Samsung Galaxy S III has arrived and now you can update it to the latest Android 4.2 version without any fear of device bricking. This Jelly Bean update has been provided by popular 3rd party Samsung software distributor Sam Mobile. Hence we can’t 100 % say that it’s an official jelly bean update for galaxy S III from the manufacture, yet it’s official.
Samsung Galaxy S III needs no explanation as it’s the top sold (still selling) high end smartphone which is currently competing with iPhone’s and HTC’s latest versions. One of my client recently contacted me via this blog and asked whether any official update for S III is available on Android 4.2 . Sorry mate, unfortunately, I couldn’t get the update file then and hence I started searching on various forums like XDA, Phandroid etc and finally found it in SAMmobile.
Let me tell you one thing, this official jelly bean update file is somewhat large in size say, about 1 GB and do make sure that you completely download the file without any interruption. Even a single file missing can cause serious aftereffects unless you root your S III. On the other hand, in case you fail on the update, you can easily get back to the stock version via CWM. Hence, it’s always better to root your Galaxy S III before proceeding.
If you aren’t technically sound or don’t know how to root, don’t worry. Chill. Just download this big file with IDM and place it in a safe place for later use. It’s always recommended to backup your precious data like contacts, calender, and all other files in the device. If you attached your Google account in your phone, it will be automatically saved (If auto sync is enabled).

Update Samsung Galaxy S III to Jelly Bean Android 4.2

  • Before all, make sure you have installed the phone drivers in your PC and it’s very important. For this, you can either install Samsung Kies Suit (given in the driver disc) or PDANet software.
  • Enable USB Debugging via Settings>Development (Must )
  • Download the official jelly bean update for S III from here. Ectract it.
  • Download Odin from here
  • Now enter your phone into Download Mode  by pressing Vol Down+ Home + Power buttons simultaneously.
  • Confirm it by pressing Vol Up key and you have successfully entered to Download Mode, which is ready to receive the files.
  • Now open Odin and attach your phone. You will see a light (green/blue/yellow) blink there. It means your phone has detected via Odin. Never ever proceed further if you don’t see the lights.
  • Make sure Re-Partition option is enabled in the Odin tool. Now click on PDA Button and locate the file ending with tar.md5
  • Click start and wait it until it transfer the file to your mobile and let it reboot after complete transaction.
It was the procedure. Now swim through the latest version and make the most from it. :D
jelly bean android 4.2 on galaxy S III

Troubleshooting

If the phone doesn’t reboot as usual after 5-10 minutes, try the following. Boot into recover mode by pressing Vol Up+ Home+ power and do factory reset.

Android Tips And Tricks For 4.1 Jelly Bean Users


Tips-and-Tricks-for-Android-Jellybean
image credits:google image search
Android is primarily designed for touch screen mobile phones based on Linux operating system. Android phones now a days, almost 65% of the total mobile phone market, the most popular cover. Simple Java-based Android phones and Symbian mobile phones that will work great. They are rich in functionality
and user friendly. Android most Android users do not know a lot about the hidden features
Phones. We are today the best Android phones you will tell you the secret android tricks and hidden features, which share an article. Different versions of Android versions, so try all the tricks android, android set up to support a variety of tricks. I am not sure it is going to work on your handset.

1) Force Reboot:

Several times in the android users in the event of your Android phone is frozen, you can reboot using an Android trick, the freezing of the mobile phone experience a problem.

Just press the volume key + Home Button + Power button at the same time.

2) Quick access to Google:

The Internet is primarily built for the Android phones, android users, many Android phones in just a single click we can access Google search did not provide a way. The trick to use android,

Press the Menu key and hold it for a couple of seconds, it will launch Google search.

3) Android restart in Safe Mode:

Such as computers, we can reboot in safe mode in Android phones. The latest android jelly bean version if something goes wrong, which provides an option to reboot in safe mode.
On your Android reboot in safe mode, follow the instructions given below.


* Long press the power button
* Long press on the selection of power.

We have an Android phone android phone and restart in safe mode, then disabled all 3rd party applications, reboot in safe mode will show a confirmation message. We usually restart my phone to re-enable these applications. 3rd-party application that may be a problem for you when you want to, in this case, to a great android and you want to hunt.

4) The face recognition unlock Android phones:

In this version, you jelly bean, face recognition can unlock your phone by using the plot to cool android, android Android phone, this feature is more secure unlock using face recognition offers
a way by which, added to the jelly bean version, we have to unlock the phone, such as the face, such as eyes that blink android phone to unlock only when there is enough for another layer of protection. Sparkling eyes, and it is a live person using an unlocked position, not an illegal attempt android notifies the security system.
To activate this,

Settings> Security> Screen Lock> Go to Face Unlock.

5) Get detailed information about the phone:

We just # * # ** # * # 4636 dial phone information, battery information, usage statistics and WiFi information can be obtained as the detailed statistics

On the use of the battery, DNS check, ping, time of application to get details about an easy-to-use time and is USSD.

6) SD card android apps Move:

Android apps installed on the SD card is a good idea, but what if you want to install apps on your phone's memory. Android phones, which we offer a way to move apps to SD card, do not worry. Apps to SD card, follow these steps:

Go to Settings> Application Settings> Manage applications> Select the application, you can select the "SD card" Move to see.

7) Hard reset and factory reset your Android phone:

This comes in handy when selling Android phone android trick. Android phones can be formatted in two ways:

    Factory reset
    Hard Reset

A) Factory Reset: Factory reset, in the format that your phone is factory level. Go through all of the default settings and all data will be deleted, meaning the interior. Factory reset the phone, dial * # * # 7780 # * # *.

B) Hard Reset: Hard phone, dial * 2767 * 3855 # to reset all data (including internal and external SD data), as well as eliminating the Android phone settings. If you are not sure, the purpose is not to try to test the code. It will not ask for a confirmation.

8) android in the context menu:

Long press on the screen, Android phones, you can customize additional options will show. This is somewhat similar to the menu on the right-click context menu is the most operating systems.

9) on the android phone for taking screen shots:

 Android phones we could take a screen shot without using any 3rd party application that provides a great feature. However, another version of the screenshot android tricks are an android version.

    Press the Home button + Power button (this trick to work on most Android phones.)
    For Galaxy Nexus: Power Button + Volume Down button.
    Swipe the screen to take a screen shot of your palm: for the Galaxy Note 2 and S3.

10) Android Version animation:

This is another cool android plot to play with your Android phone.
The trick to use android, go to Settings> Phone> Tab repeatedly about the 'Android version' on.
After some time, Android version will be shot.

If you are a jelly bean android user, then you can check out the tricks of the jelly bean android users 5 secret

On Android tricks you to think, kindly comment in the box below for your valuable comment.
AND MORE AND MORE TRUCKS HERE ABOUT ANDROID

Quickly, now Google 'to launch


Google has now jelly bean is one of the main highlights - Android OS update's growing; customers at the right time to provide the required information and search for information in an attempt to save them, especially at the last moment. Now that Google started as soon as you (or you're using other apps) can use it right from the home page.
Trick: (with the logo printed on it), pop out of the semi-circles with a white long-press the home page, which prompts you to enter. Drag your finger on the side of the logo and voila! Google has now launch almost immediately!
Tip: Alternatively, you can also return to the main page applications DRAWER button or press the button, and the same action (Google logo on the side of your finger and drag it) again.

To get rid of unwanted ads


Jelly bean of Android is a trademark slide down the notification bar. Quick warnings, with the selection, deployment, and a preview of some of the ads - but, it has a number of interesting changes.

Tip: You can also just swipe sideways, then, a statement from time to time in the notification bar does not want to be bugged, and you will be able to relax a specific ad, and if you continue to work.

Easy to use Face Unlock


Face unlock your mobile devices, more and more Android devices in terms of the individual making one of the best things to do. Jelly Bean Face Unlock feature 'Liveness check' adds the option. Now, unlock your device, you do not have to deal with only a camera, but also the 'blink'. It is a static photo of the owner to unlock it who can unlock the device by holding the true owner, and an imposter, will testify. Now this I call a good safety feature!
Tip: In case the Face Unlock feature because it fails to detect a blink, alternatively, set an unlock pattern, you can always design (set) can be used to unlock your device.
Taking screenshots in a jiffy

Jelly bean rooting your device, or download and use without the need for third-party applications on the activity has a built in screen.
Trick: If you want to take a screenshot, only the 'volume down' button and the 'power buttons' together and taking a snapshot of the screen on your device (in your ads), you will be notified. After this, you can easily edit and even share the screen.

Deleting an application


Deleting an application for Android devices, it editable and then appeared on the screen, the 'trash bin' to the drag the icon has become a symbol of long-users need to press. Not anymore!
Trick: If you need to remove your device from any application, just long press and then throwing it up. If you were to take this action, your application will be deleted.

Change the text to speech option


With Google has now - jelly bean is one of the most prominent features of the text-to-speech feature that has become more and more powerful. If you wish to use this feature, however, then you can turn off this feature only.
Tip: Settings> language and input> Voice Search> Go to the speech output. 'Speech Output' option (only available in hands-free mode) Toggling you, or text-to-speech feature allows off on.
Confirmed

This is an Android Jelly Bean on the device you want to use the basic tips, some. You can also search for various websites, more and more of these tips and tricks and use them.

How to Download youtube video on android


How to download youtube video on android.

Downloading youtube videos on android can be a nasty task, since there is no app in the android market for this. So can you still download youtube video directly on to your android powered mobiles phones and tablets? Yes you can but its a bit nasty. Since there is no consistent app for this on android market, google play store you dont have another choice. So how to accomplish this? Lets see how to download youtube videos on android.

Downloading youtube video on android phones.

  • You need to get the link to the video in order to download it. So the first step is all about getting the link to your youtube video.
  • There are different methods to copy the url of the video, you can follow any of those steps which you think is easier for you.
  • Through browsers like opera mini, GO to youtube and search for your video and while the video is playing look for the share button. In the share options there will be an option to share the video by sms. select that and you will get the url in the message. copy the url from there.


youtube url share


youtube url copy

  • The same technique can be used to get url using any of the browsers, even on the stock browser of your android.
  • Using youtube app: open youtube app search for the video you want to download. Press menu and select share and select sms from it. You can copy the url from there.

youtube app share url

  • So now you have the url. Once you have the url copied then follow to the next steps.
  • After copying the url of the video to be downloaded got to keepvid.com.
  • Paste the url you just copied into the search box on the keepvid website, and press the download button.
  • keepvid will now list download links to the video in various format, You can select high defenition or the normal definition link, and download the youtube video and save it.
So thats all about downloading youtube videos directly on to your android powered mobile phones or tablets. If you know a better way to do the same please let us know. You can share your ideas in the comments section. If you found this article helpful do share it with your friends. And like us on face book. Stay subscribed with us for further updates on similar topic.

How To Increase The Battery Life Of Your Android Mobile Phone


Friends battery is everything for a android device.So why are you not saving your device battery or i think you don't know the ways to save the battery of your android device.Then don't worry today you will learn to save the battery of your android device.So keep enjoying my article.
Battery Booster App is the best android app that will helps you to save the battery life of your android device by automatically disable the unwanted applications and functions.
This app works in background of your android device and disable the unwanted opened functions like Bluetooth and wi-fi when we are not using them and unwanted applications like pesky auto-sync option in Facebook which is the best battery killer according to me.

How It Works With Your Android Device:

1)Download the Battery Booster Android App from the Google Play Store.
2)Run in the background after downloading the app.Opened the app and read the instructions provided.The app will explain how it works, and how much battery life you can save while using its features. Once read, press on the See Battery Usage Stats button.


Step 3:Why the drain? The application will now take you to a complete rundown of all the elements that are draining your battery. As you scroll through the list you might be surprised with how much spring cleaning you need to do. Press on one of the options that consumes a lot of battery.
Step 3:Start to disable features You’ll now see an even more detailed breakdown of how much battery life that particular feature or app drains. You can choose to permanently disable the feature, force stop it or you can edit the feature’s settings to tone back on its battery usage.
Do you know any another android app that will saves your android device battery life.Then share with us by comment below

Latest 5 Simple Steps To Keeping Your Smartphone (And Data) Safe


Smartphones have evolved from being able to just check email and has now allowed us to do so many other things when paired with other devices. Nowadays, we can pay with our smartphones with digital wallet apps are able to store multiple credit cards. Most of our private information(together with other contact information) can be found in the apps on our smartphone through chatlogs, pictures, calendars, and notes.
Mobile Security
This is why we rely so much on our smartphones and store so much sensitive data on it to make our lives easier. With all these sensitive data onboard a tiny device, we should pay more attention to keeping it safe and away from anyone unwanted. Here are some precautions to help you.

1. Set Lockscreen Security That Self-Destructs

Leaving your phone unattended on a desk for a few minutes could lead to someone accessing it to extract lots of vulnerable information. Which is why enabling lockscreen security is essential to keeping your smartphone away from unwanted users.
This is the easiet way to defend you and your data, and pretty much every smartphone has this feature. Manufacturers know privacy is important to users.
Some thieves would try breaking the lockscreen by trying out passwords but to really keep your data safe from brute force hacking, you could enable a feature that erases all data from your smartphone after a preset number of failed attempts.
On the iPhone, it can be enabled under Settings > General > Passcode Lock > Erase Data.
iPhone Lock
By default, this kind of feature is not available on the Android, but you can enable a similar effect with a free app like Autowipe .
Autowipe

2. Turn Off Settings When Not In Use

Hackers are able to do all sorts of things that will surprise you. Turning off phone settings like Bluetooth, Location Services, Near Field Communication (NFC), Wi-Fi and even Cellular Datawhen not in use not only conserves smartphone battery but also gives hackers less access to your device.
Location Services and Bluetooth should not be turned on when not in use as apps can use lots oflocation data without you knowing it. As Bluetooth is constantly transmitting your devices’ location and presence, it is possible for hackers to use it to gain access and extract any kind of information found on your device.

3. Don’t Download Shady Apps

Apps are probably the only thing that can harm you by stealing your personal data. When downloading an app, make sure that all the details of the app comes from the original ‘company’ or correct developer. Some sneaky apps might even trick people to download a "New and improved HD version" of a legitimate app, so make sure you check a few app details before downloading.
For instance a mobile banking app (or any app that handles financial accounts) should come from the bank itself as seen here on the iOS App Store, and not some other seller or developer.
Apps
App ratings and comments can also tell a story. If it’s a popular bank or financial service (PayPal) app that has no rating or comments, chances are it might be fake and you should be careful about downloading it and logging in. So be sure to download apps only if it has been rated many times and has multiple comments.
Rating

4. Be Wary Of Fishy Apps And Links

Viruses on mobile platforms can be present in many ways. It can be in the form of a ‘dirty’ app that runs in the background transmitting user data. As the Android system allows third-party apps or programs to be installed (very easily), Android users may open their mobile system up to attacks if they are not wary of the apps they download to their phone.
There are however anti-virus scanning apps and other tools on Android that can detect and remove anything that can harm your privacy.
Mobile Security
iOS users do not have anti-virus scanning apps, basically because there isn’t a pressing need for it.Apple is very strict with what gets on the App Store and will take down apps that harm its users in any way. Skip clicking on links in SMS, MMS, or even email attachments from unknown or un authorized senders. Avoiding anything fishy altogether is very simple and should be practiced.

5. Do Not Lose Your Smartphone!

Not losing your smartphone is sometimes easier said than done. Of course no one wants to lose their smartphone, but unfortunate circustances might happen. You might have left it in a bar, in public transport, someone pick pocketed you during your vacation or you might have grabbed someone else’s phone by mistake. In all accounts, chances are your phone is good as gone.
Lost Smartphone
If these things have a tendency to plague your life (some of us are serial phone-losers), installing apps that can locate your smartphone on your iOS or Android device is essential. These apps can help you locate your phone and some have the option to wipeout the data on the phone so you don’t become a victim of identity theft.

How To Move Your Music Files From An iPod To A PC


If you’ve ever gotten the black, blue, red or any other color “screen of death” on your iPod, you know the frustration that follows. Those John Tesh Acoustical Jams weren’t easy to find and now they’re trapped in limbo with virtually no way to access them. You can try and take the deactivated Pod to an Apple technician but that could be costly and there’s no certainties they can fix the problem or at least save your music.
If you have the songs saved on your computer, you have options. Unfortunately, many music collections have been acquired over time and from many different locations. This advice will help you convert your music from your iPod to your PC so that John Tesh can withstand an unfortunate iPod crash.

Move Your Music Files From An iPod To A PC

The first thing you’ll need to do to transfer music from your iPod to your PC is to show all your hidden files.
Now that you can view all the files on your computer, plug in your iPod using the USB port. In windows explorer, click on the folder of the drive that is corresponding to your iPod. In this folder, you should see another folder titled “ipod_controls.” In the ipod_controls folder you’ll find files of music. The names will be scrambled something to the like of __Tesh__.. Drag all these files to a folder on your hard drive and they’ll be saved on your PC.
Just having the files on your hard drive isn’t enough, you’ll need to drag them into iTunes in order to put them on an iPod.
1. Open iTunes and go to the edit menu and choose preferences from the menu.
itunes edit menu
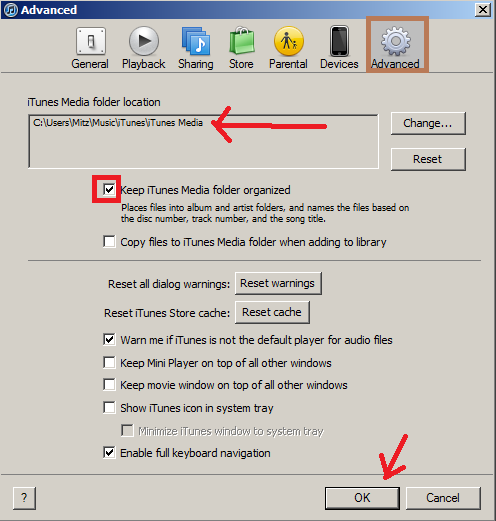
2. Click on the Advanced icon. See the screenshot below.

4. In the dialog box, select the folder on your hard drive where you dragged the music files. You can do this by clicking on the change button.
There’s also a box asking to “keep iTunes music organized” and you should make sure that this is checked.
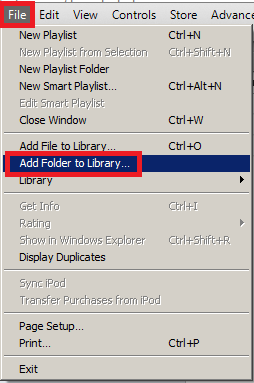
5. Now in iTunes go to File>Add Folder To Library and select the folder on your hard drive where you transferred the music.
6. The music will then be transferred to this iPod and the names will conveniently be restored with song titles, album covers, artist name, etc.
Transferring music from your iPod to your PC is a great way to ensure your music library is never compromised. You can transfer your entire collection to multiple iPods without having to sync them up to different computers. Of course this will take up memory on your PC so it might be a wise idea to purchase a removable flash drive or an external hard drive so that you can free up space as well as take your library on the go. At the very least, transferring your music from the iPod to the PC provides a safe back-up plan to ensure you’re never without Tesh.

How To Download Torrent Files with IDM-New Trick


 So I am posting a website www.zbigz.com/myfiles that helps you in downloading torrent files with IDM.
We all use Torrent to download various kinds of files like songs,movies,books,software's and much more.The download speed of torrent depends on many factors like seeders,leeches,peers, Internet connection and much more.Sometimes you may face difficulty in downloading torrent files with less seeds which results in slow download.So here I got a trick to Download Torrent Files With IDM keep reading.
Download+torrent+files+with+idm

Advantages of downloading torrent files with IDM:

1.Internet Download Manager(IDM) is the best download manager and speeds up your overall download speed by 5 times.
2.Internet download manager speed doesn't depend on seeders,leeches etc,it only depends on your Internet connection. So, you can download torrent files with IDM without any difficulty if you have good net connection.
4.If Torrent is blocked in your offices,schools,colleges etc then you can download torrent files with Internet download Manager(IDM) easily.
5.Downloading Torrent Files With IDM is really useful when you are downloading files with less seeds.

Steps To Download Torrent Files With IDM:

1.First go to Zbigz.com[Click Here].
2.Signup for a free account there.Get Premium account from here.
3.After the signup process is finished go to your torrent search engine and search for the file which you want to download with idm.
torrentz+search
4.Then download the torrent file from your desired torrent.
Download+torrent+file
5.Now go to Zbigz.com[Click Here].
6.There hit on upload and choose the torrent file which you have downloaded previously then hit Go.
upload+torrent+file+to+zbigz
7.Then a window will pop up asking for premium or free download.Choose Free Download.
free+and+premium+accounts+in+zbigz

8.After choosing free your torrent file will be downloaded by high speed servers and your file will be ready to download(If its a large file then wait for few minutes).
download+file+from+zbigz
9.When you hit download button then a box will pop up asking the type of download which you want either free or premium.Go for free download.
downloading+torrent+file+with+internet+download+manager
10.That's it your download will be ready and you can download torrent files with idm.
Update 1:If you feel that your file is not caching properly by zbigz,then first get cached link using torcache.net then paste that link in zbigz  and hit go.
Update 2:If you are having trouble in download files with zbigz.com then you can try alternate services like zbigz.com.
 

Sample text

Sample Text

Sample Text

 
Blogger Templates