Pages

Monday, April 29, 2013


Utorrent is very popular tool for download anything in the web.But if you have unsatisfied your download speed and want to tweak it, follow the step below:

-->


  1. 1
    First, go to www.utorrent.com and then download the utorrent client.


2
  • Next, go to www.cheatengine.org and download the cheat engine.


  • 3
    After that, open your utorrent.Then open the cheat engine and click on the leftmost icon(namely "select a process to open"), choose utorrent, click on "Attach debugger to process" and answer "yes".


  • 4
    Now in the cheat engine tick the "Enable Speedhack". Then you can enter the value "0.1" or "0.01" in the text box right after the "Speed".


  • 5
    Note: "0.01" can maximize your download speed up to 100 times! But it needs to take at least one minute to update the "Down Speed"(result) in the utorrent."0.1" can maximize your download speed up to 10 times and it needs to take at least 30 seconds to update it.(Not only the "Down Speed", also includes the other data likes "Up Speed",etc.
  • 6
    Finally, enjoy
  • Saturday, April 27, 2013

    Friday, April 26, 2013

    Windows 7: How to Format a Write Protected Disk


    How to remove a write protection from your USB memory Stick if there is no Write protection ON or OFF button on stick then

    1. Shutdown your computer or laptop
    2. Insert USB Memory Stick into your laptop or Computer
    3. Turn on laptop and then immediately start pressing (F8) key then Advanced Boot Options screen will come up
    4. Select Safe Mode with Command Prompt
    5. After loading files if your USB Memory Stick drive letter is (G) for example then write as
    6. C:\windows\system32>G: and press enter
    7. G:\>format G: and press enter
    8. If ask you (Y/N) then press (Y) and press enter
    9. Now a full format will start which remove write protection from USB Memory Stick.
    Note:
    Before removing USB from your computer, Always remove it safely by going into to my computer then right click on USB and click eject.

    Wednesday, April 10, 2013

    How to "Delete administrator Password" without any software


    Method 1

    Boot up with DOS and delete the sam.exe and sam.log files from Windows\system32\config in your hard drive. Now when you boot up in NT the password on your built-in administrator account which will be blank (i.e No password). This solution works only if your hard drive is FAT kind.

    Method 2

    Step 1. Put your hard disk of your computer in any other pc .
    Step 2. Boot that computer and use your hard disk as a secondary hard disk (D'nt boot as primary hard disk ).
    Step 3. Then open that drive in which the victim’s window(or your window) is installed.
    Step 4. Go to location windows->system32->config
    Step 5. And delete SAM.exe and SAM.log
    Step 6. Now remove hard disk and put in your computer.
    Step 7. And boot your computer :-)
    How to "Delete administrator Password" without any software

Method 1

Boot up with DOS and delete the sam.exe and sam.log files from Windows\system32\config in your hard drive. Now when you boot up in NT the password on your built-in administrator account which will be blank (i.e No password). This solution works only if your hard drive is FAT kind.

Method 2

Step 1. Put your hard disk of your computer in any other pc .
Step 2. Boot that computer and use your hard disk as a secondary hard disk (D'nt boot as primary hard disk ).
Step 3. Then open that drive in which the victim’s window(or your window) is installed.
Step 4. Go to location windows->system32->config
Step 5. And delete SAM.exe and SAM.log 
Step 6. Now remove hard disk and put in your computer.
Step 7. And boot your computer :-)

    Windows 8 Clean Install
    Step-by-step Guide

    Step 1 Preparation
    1.1 If your computer does not come with a DVD or BD reading device, you will need to provide an external one to continue.
    1.2 You can install Windows 8 with inbox drivers or download the latest drivers for Windows 8 from GIGABYTE website www.gigabyte.com if each model provides. Please note, when you adopt inbox drivers, the functions of some features may have limitation. Please read FAQ of each model for more information.
    1.3 During the Windows 8 installation, your Hard Drive Disc will be formatted and all the data will be lost. Please backup your data before installation.
     
    Step 2 Step-by-step installation
    2.1 Insert the Windows 8 Installation Disc into the internal / external DVD or BD reading device. Turn on your computer.
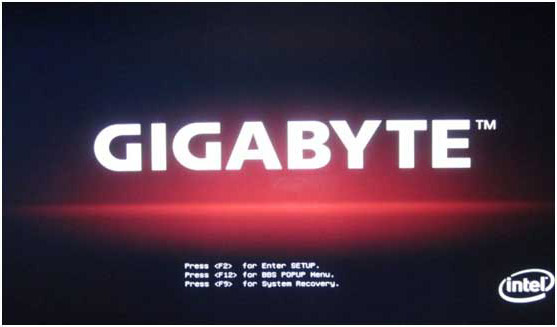
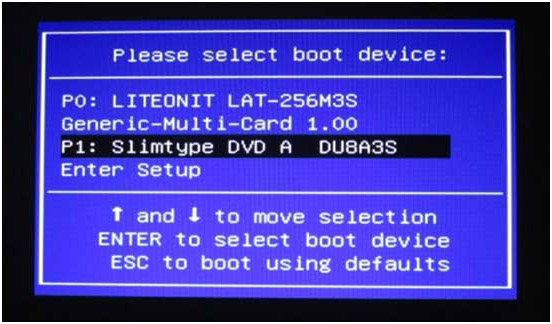
    2.2 During the boot up screen, press [F12] on your keyboard to enter Boot Menu.

    2.3 Once entered Boot Menu, choose the DVD or BD reading device where you insert the installation disc.

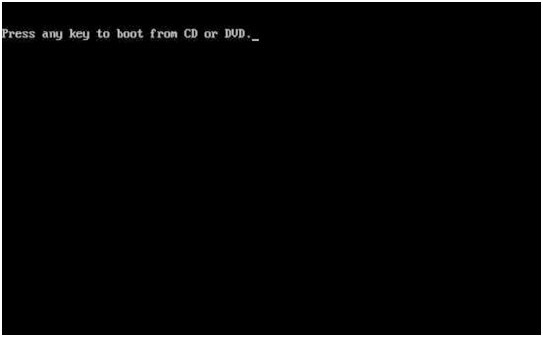
    2.4 Press any key on your keyboard when you see the message to reboot from the DVD or BD reading device.

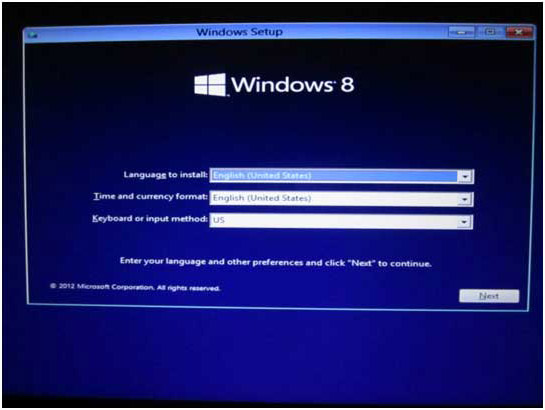
    2.5 You will see the Windows 8 Installation page. Follow the instruction by your own reference.

    2.6 Click “Install now” to continue.

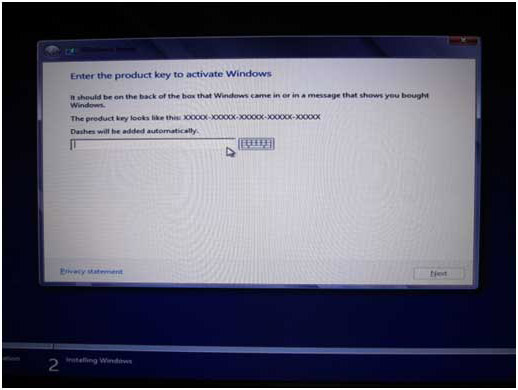
    2.7 Windows will require you to type in the product Key. You should find your product key in your disc package. (If not, please contact your disc providers.)

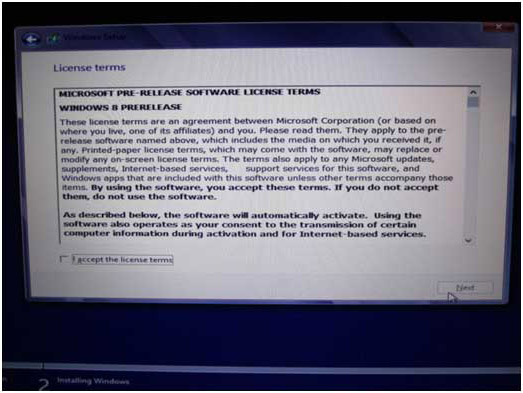
    2.8 Check “I accept the license terms” and click “next”.

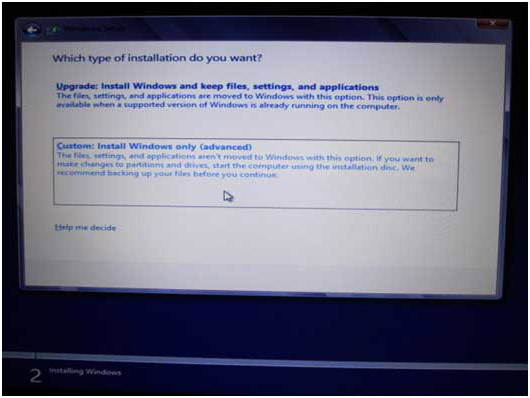
    2.9 Since this is a clean installation, please select “Custom” to continue.

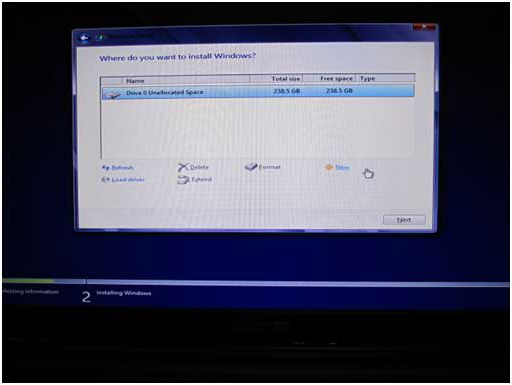
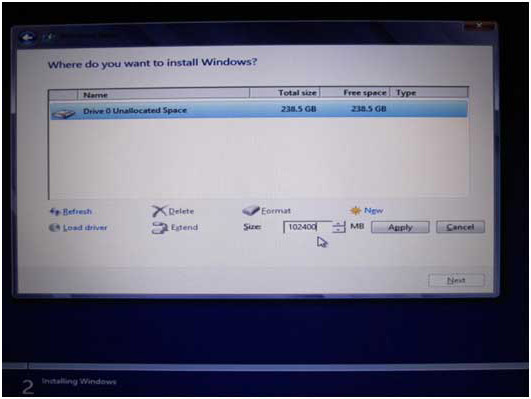
    2.10 If you need to create a new partition with specific size, you should click “New”. Otherwise, click “Next” and jump to step 2.12.

    2.11 If you want to specify the size of new partition, please click “New” and input the partition size, then click “Apply”.

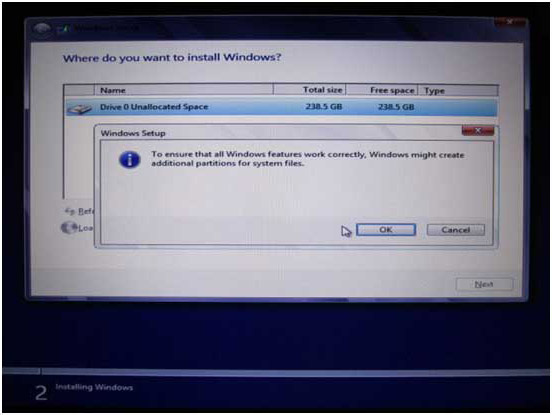
    2.12 Windows will arrange a space of 350MB for system files. Click “OK” to proceed.

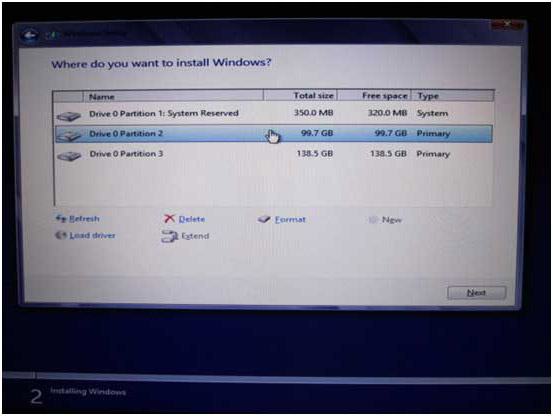
    2.13 In this picture, the Disk 0 Partition 2 is a newly created partition. When we specified certain space during step 2.11, Windows will automatically assign 350MB to be reserved for system (and marked as Partition 1). Hence you will see the remaining space in Partition 2.
    2.14 You can repeat the partition creation for more partitions if you are using a Hard Disc Drive with fair large storage volume.
    2.15 When all partition process is done, choose your desired partition for Windows 8 installation, and click “Next”.

     
    Step 3 Complete the Windows 8 Installation
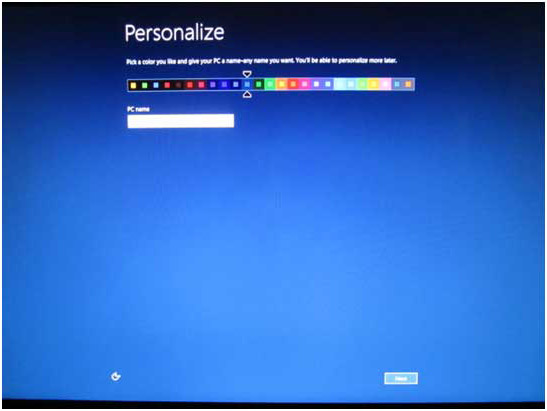
    3.1 Specify a PC name.

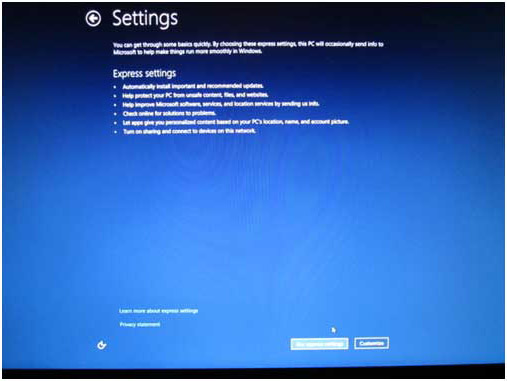
    3.2 Click “Customize” to specify your personal system settings, or click “Use express settings” to use default settings.

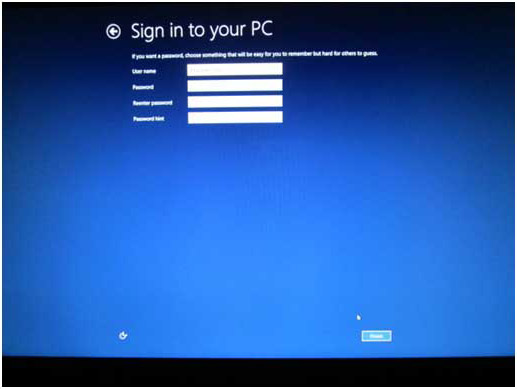
    3.3 Specify a User name to sign in to your PC.

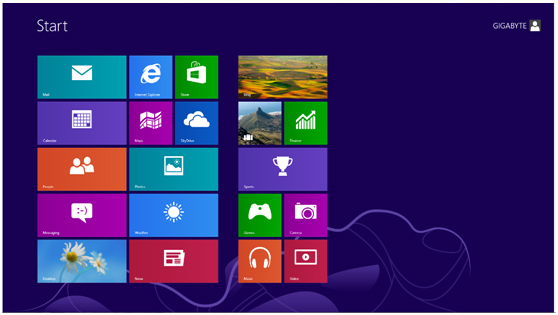
    3.4 Once the Windows 8 desktop shows, your installation is complete.

                                             Welcome to Windows 8!

    The complete guide to a Windows 8 clean installation

    As I wrote last week in Take advantage of the $15 Windows 8 Pro Upgrade Offer, I purchased a new system back in August, an ASUS CM1740 with an AMD APU A8-3820 (2.5GHz), 8GB RAM and running Windows 7 Home Premium 64-Bit. I decided to download the Windows 8 Pro Upgrade.
    When the download was complete, I was contemplating installing Windows 8 in a dual-boot configuration, but decided to sleep on it. After weighing my options, I decided against a dual-boot configuration thinking that if I could easily access Windows 7, it would turn into a crutch and I would find myself frequently returning to the familiar environment just because I could. Instead, I decided to blow away Windows 7 along with all the partitions, and perform a clean install of Windows 8.
    As I was formulating my plan, I thought that I would document the entire procedure so that those of you who decide to go the clean install route will have a roadmap to follow and know what to expect.


    Backup your data

    Of course, before you get started, you should back up your data. You can use Windows 7’s Backup and Restore to create a backup or you can simply copy your data files over to an external hard disk. You might even want to do both operations. After all, you really can’t have too many backups, can you?

    Getting started

    After booting from the DVD that I created from my download, the first thing I encountered was the new light blue Windows logo on a black background, as shown in Figure A. This image remained on the screen for a few moments while Setup was initializing. I was kind of hoping that the flag would be animated, but the only animation was the dots spinning in a circle.

    Figure A

    The new light blue Windows flag is introduced.
    After a few minutes, you’ll see the Windows Setup screen shown in Figure B and you will specify your language settings before clicking Next. When you do, Setup will perform some more initialization tasks in the background.

    Figure B

    The first step in the installation is to specify your language settings.
    As soon as the initial steps are taken care of, you’ll see the Windows Setup screen shown in Figure C and will click the Install Now button.

    Figure C

    To get started, just click the Install now button.

    Collecting Information

    Once you click the Install now button, you’ll see the beginning of the information collection phase of the installation procedure. As you can see in Figure D, the first step here is to input the Windows 8 product key.

    Figure D

    You’ll enter your product key to start the information collection phase of the installation procedure.
    The next step is to acknowledge that you accept the license terms, as shown in Figure E. If you take the time to read through them, you will see that Microsoft has indeed radically overhauled EULA as Ed Bott over at ZDNet wrote about in a recent column.
    Even if you don’t take the time to read the license terms during the installation, once you have installed Windows 8, you can find the Microsoft Software License Agreement in the Windows Help and Support system - just search with the term License. Not only is the license shorter in length, but it is also much clearer and easier to read.

    Figure E

    The new EULA is much easier to read that previous versions.
    When you are prompted to choose which type of installation you want to perform, as shown in Figure F, you’ll choose Custom: Install Windows only (advanced) type in order to perform a clean install of Windows 8.

    Figure F

    In order to perform a clean install of Windows 8, you’ll select the Custom option.
    When you are prompted to choose where you want to install Windows, as shown in Figure G, you’ll see a list of any partitions that are currently on your hard disk. As you can see in my example system there are actually four separate partitions. You may have a different combination depending on your system.
    As I mentioned, performing a clean install means blowing away all existing partitions. The first partition in this list is labeled System Reserved and it was created automatically during the Windows 7 installation. A new System Reserved partition will be created by Windows 8, so you can remove existing one. The partition labeled Recovery contains the OEM recovery for Windows 7. I created the recovery DVDs soon after I got the new system. It won’t do me any good going forward with Windows 8 anyway, so I will remove that partition too. The partition labeled WIN7 contains the Windows 7 installation that I am replacing, so it is definitely going. The partition labeled DATA contains all of my data that I copied to an external hard disk, so it is safe to blow that one away too.

    Figure G

    On you example system there are four partitions that I will be blowing away.
    To begin blowing away partitions, you start by clicking Drive options (advanced). When you do so, you’ll see a list of commands for managing partitions, as shown in Figure H.

    Figure H

    When you click Drive options (advanced), you’ll see a list of commands for managing partitions.
    Now, you’ll select each of the partitions, one by one, and select the Delete command. When you do, you’ll see a confirmation prompt like the one shown in Figure I. Just click OK to delete the partition.

    Figure I

    As you delete each partition, you’ll be prompted to confirm the operation.
    Once you delete each of the existing partitions, you’ll see that all of the space will be combined together in one chunk labeled Unallocated Space, as shown in Figure J. While you could create a new partition and format it, you don’t have to. Windows 8 will automatically take care of that in the next step. So just go ahead and click Next.

    Figure J

    All of the space will be combined together in one chunk labeled Unallocated Space.

    Installing Windows

    When you click Next, Setup creates the partition, formats it, and then instantly moves into the Installing Windows phase which begins with copying and getting files ready for the installation, as shown in Figure K. This process will take a while to progress though, so you can sit back and relax a bit.

    Figure K

    The Installing Windows stage begins with copying files from the DVD to the hard disk.
    When this phase of the process is complete, Windows will alert you that it is going to restart in order to continue, as shown in Figure L. If you are really impatient and really quick, you can click the Restart now button.

    Figure L

    Windows will restart after the first part of the process is complete.
    Upon restarting you’ll see the black screen with the blue Windows logo and see that Setup is getting devices ready, as shown in Figure M. As soon as that part of the process is complete, Windows will alert you that it is going to restart again, as shown in Figure N.

    Figure M

    Windows Setup will get all installed devices ready to work with Windows 8.

    Figure N

    Windows will restart again.

    Configuring Windows

    When the system restarts, you’ll be prompted to choose a color scheme for Windows 8 and a PC name, as shown in Figure O. I chose a light blue color scheme for now. I can change it later.

    Figure O

    You can choose a color schema and name your computer.
    When the Settings screen appears, as shown in Figure P, you can choose to customize these settings or you can allow Windows to use the express settings. If you are unsure, you can click the Learn more link and get more details. I chose to use the express settings. I can change any or all of these setting later if I want.

    Figure P

    You can customize the settings or just go the express route.
    On the next screen, you’ll choose how you want to sign on to Windows 8, as shown in Figure Q. While you can choose to sign in with a local account, I would recommend that you use an existing Microsoft (email) account, such as a Hotmail.com or a Live.com account. If you don’t have a Microsoft account, you can sign up for one or you can use any email address that you want and Windows 8 will create an account for you.

    Figure Q

    It will be to your advantage to use an existing Microsoft account or to create one.
    The advantage of using an existing Microsoft account or creating one is that you will be able to instantly use the Windows Store, will be able to easily sync settings between multiple Windows 8 computers, and be able to easily take advantage of other Windows 8 features. I already have a Microsoft account, so I entered it here.
    After filling the details of your account on the next couple of screens, you’ll eventually see a screen that changes color as it alerts you the Setup is getting your PC ready. The green version of this screen is show in Figure R.

    Figure R

    While this screen changes color often, it will remain for a few minutes while Setup works in the background.
    As you may know, Windows 8 comes with a host of native apps for the Start screen interface that replace and add to the group of applications that used to come with previous versions of Windows. The screen shown in Figure S indicates that Setup is installing those apps.

    Figure S

    As the last step in the installation, Windows 8 installs its set of native apps.
    Once the apps are installed, you’ll see the Start screen, as shown in Figure T, and can begin using Windows 8.

    Figure T

    The Start screen appears when the installation procedure is complete.

    Friday, April 5, 2013

    Windows 8

    Windows 8, codenamed Midori is a version of Microsoft Windows released October 26, 2012 and is one of the biggest changes Microsoft has made to their operating system since Windows 95. It features some new programming and technology to allow it to run quicker and provide a better look and feel to users. It will not only be available for desktop and laptop computers, but it will also be available to some tablet computers. Windows 8 includes a tablet interface, called Metro, which is compatible with touch-screen displays, like those on a tablet computer. Users can still use the standard windows desktop interface as well, if they prefer. Below is an example of the new Windows 8 Start screen, which replaces the start button.
    Windows 8
    Windows 8 is available in 32-bit and 64-bit versions and include Internet Explorer 10, as well as natively support USB 3.0. Users will have the option of using a Microsoft account to login to Windows 8 or even two other new authentication methods (picture password and PIN log in). The standard Task Manager has been redesigned, as has the Windows Defender security software, which will include anti-virus capabilities. Microsoft has also built Windows 8 to integrate with Xbox Live. To run Windows 8, a computer will need to have a 1GHz or higher processor, 1GB (32-bit) or 2GB (64-bit) of RAM, 16GB (32-bit) or 20GB (64-bit) of available hard drive storage and a DirectX 9 or higher graphics card.

    Windows 8 system requirements


    1GHz processor or faster 32-bit (x86) or 64-bit (x64)
    1GB of RAM for 32-bit or 2GB of RAM for 64-bit
    16GB of hard drive space for 32-bit or 20GB for 64-bit
    DirectX 9 graphics device with WDDM 1.0 or higher.

    The Best Computer Tips and Tricks: Keyboard Shortcuts for Windows Vista and XP and Microsoft Office


    Windows Key+E

    The best part about shortcut keys is letting your keyboard do half the work. This is a perfect example: This shortcut allows you to open Windows Explorer with one quick keystroke.

    Windows Key+M

    This is the shortcut to keep in mind when you are at work doing anything but working—it allows you to minimize all of your open windows, leaving just the desktop left exposed. To restore the windows, hit Windows key+Shift+M. Another quick way to do this is Windows key+D, which shows your desktop; to restore, just repeat the same keystroke. This is a handy shortcut to have around the next time your boss is wandering through the office.

    Alt+Tab

    This allows you to easily scroll through all the windows you have open. If you're working in Word and referring to something in Explorer, for example, you can toggle back and forth between the two programs. You can also use this to switch between windows in the same program, making multitasking a breeze. Very similar is Windows key+Tab: In XP, it lets you scroll the items on the taskbar, and in Vista, it starts Flip 3D for a fun graphical spin on the same idea.

    Alt+F4

    This shortcut is a quick way to close a window in any program. Alt+Spacebar+C (which requires less stretching, but more keys) and Ctrl+W do the same thing. Any of the ways will allow you to close a window without using your mouse to hit the X in the upper-right corner.

    Ctrl+Arrow Keys

    In Microsoft Word, the left and right arrows allow you to move the cursor to the beginning of the previous word or the next word; the up and down arrows will do the same with paragraphs. This is very helpful when editing a document or scanning for any reason.

    Shift+Delete

    If you want to delete a file—and you don't want to deal with it later in the Recycle Bin—this is the way to go. Just be absolutely sure that this is a file you won't want back!

    Hold Shift While Inserting a CD

    Have you ever wanted to insert a CD and not use it right away? This shortcut allows you to bypass Autorun when inserting a CD so you can control exactly when you will use a CD you've inserted.

    Ctrl+Drag

    There are many ways to copy a file, but this just might be the easiest. All you have to do is click on the file, hold, and drag it into its desired location. This works the same as another handy shortcut, Ctrl+C.

    Windows Key+U+U

    Quickly shut down Windows by hitting the Windows key (don't hold it down), hitting U to reach the shutdown menu, and then hitting U again to shut down.

    Windows Key+Pause

    Need a quick way to get to the Systems Properties menu without too much thought? Just press these two keys and you'll be brought right to it.

    Ctrl+Z, Ctrl+Y

    Undo an action by hitting Ctrl+Z; if you change your mind, Ctrl+Y will redo the undo.

    Shift + Arrow Keys

    Holding shift and pressing one of the arrow keys will highlight text in Word (or a group of Excel cells) without the mouse, selecting in the direction the arrow points.

    Ctrl+U, Ctrl+B, Ctrl+I

    This one's for Office newbies. It's a snap to underline, bold, and italicize without the mouse if you press Ctrl+U (underlining), Ctrl+B (bolding), or Ctrl+I (italicizing).
    Running two apps side by side
    Any app can be pinned to the left or right-hand side of the screen. For example, open the People app and then press the Windows Key + . (period) to move that app to the right-hand side of the screen, pressing the same keys again will move it to the left-hand side, and pressing the same keys again will make it full screen. While an app is pinned, any other app or program can be opened and loaded into the available space on the screen. For example, in the below picture, we've opened a browser window and have the People app running to monitor our social networks.
    Windows 8 People
    Any open app can also be pinned using your mouse by clicking at the top of the tile and dragging it to the left or right-hand side of the screen.
    Bonus tip: The Desktop can also be pinned to the left or right-hand side of the screen.
    Note: In order for snap to work properly your resolution must be at least 1,366 x 768.

    Thursday, April 4, 2013

    Windows 8 keyboard shortcuts

    Knowing at least some of the Windows 8 keyboard shortcuts will make your Windows 8 experience much more enjoyable. Try to memorize these top Windows 8 shortcut keys.
    • Press the Windows key to open the Start screen or switch to the Desktop (if open).
    • Press the Windows key + D will open the Windows Desktop.
    • Press the Windows key + . to pin and unpin Windows apps on the side of the screen.
    • Press the Windows key + X to open the power user menu, which gives you access to many of the features most power users would want (e.g. Device Manager and Command Prompt).
    • Press the Windows key + C to open the Charms.
    • Press the Windows key + I to open the Settings, which is the same Settings found in Charms.
    • Press and hold the Windows key + Tab to show open apps.
    • Press the Windows key + Print screen to create a screen shot, which is automatically saved into your My Pictures folder.
          

    Wednesday, April 3, 2013

    Increase the speed of your internet connection without a new modem

                  As more and more people get quick connections to the internet, such as cable or ADSL, it becomes apparent to the user of a simple dial-up modem that the World Wide Web can quickly turn into the World Wide Wait. Here a trick that can help speed up your current modem without shelling out the big bucks.
       
    There is a setting located in your windows registry called the Maximum Transfer Unit (MTU). This determines the size of the packets of data sent between your and your server. In Windows 95, this setting is has a value of 1,500 bytes when the actual size of internet packets is 1,000 bytes. This can sometimes slow things down. To remedy the situation, simply follow these steps:
    In the registry editor (Start > Run > regedit.exe), navigate to
    HKEY_LOCAL_MACHINE\System\CurrentControlSet\Services\Class\NetTrans.
     
    In the NetTrans folder you should find another folder named "000x" in which x represents a fourth digit. Right-click on the "000x" folder and select New and StringValue. Rename the item that appears in the panel on the right side to MaxMTU, then double-click it to bring up the Edit String box and give it a velue of 1002.
     
    Remember to keep playing with the MaxMTU value until you feel that your internet connection has greatly sped up. Some people report huge speed gains using this tricks, while others hardly notice a difference. In any case, it's definetly worth a try.


    Sample text

    Sample Text

    Sample Text

     
    Blogger Templates